How to Make Fresh Pasta
This post may contain affiliate links, including those from Amazon.com, which means we earn a small commission off your purchases. And here's the thing: We only mention services and products that we think are truly worth your attention, whether they're free, paid, or otherwise. This site relies on YOUR trust, so if we don't stand behind a product 110%, it's not mentioned. Period.
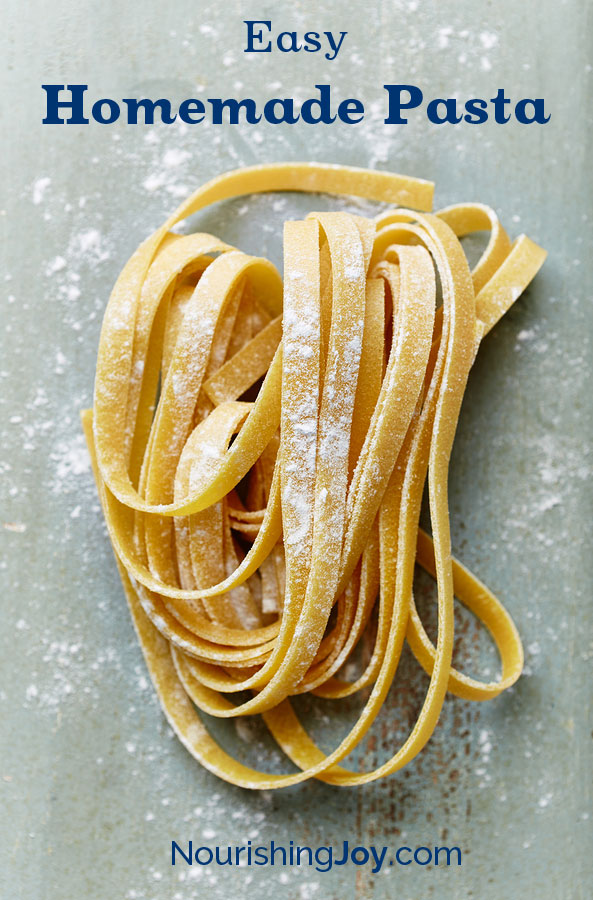
For some of the world, noodles are traditionally made with merely flour and water. In other parts, traditional pasta is flour and eggs. But for modern cooks (like myself) who like things richly flavorful yet easy to put together, pasta is made with flour, eggs, olive oil, and salt. This gives the greatest elasticity to the dough and makes the pasta light and rich as it cooks.
Make sure you give yourself time to knead the dough and let it rest properly. These are essential for achieving a soft, elastic dough.
This is also a great dinner to make with kids. Kids love to turn the crank on the pasta machine or roll out the dough with the rolling pin. My five-year-old daughter always comes running when she sees me take the pasta machine out and eagerly helps through the whole process.

Want more simple homemade recipes?
Our ebook, Restocking the Pantry, 2nd edition, is stuffed chock-full of easy-to-make recipes for all of your everyday basics, like ketchup, Ranch dressing, pancake syrup, and even Worcestershire sauce.
With 100+ tried-and-true recipes, this ebook makes it easy to avoid all the preservatives and additives in the store-bought versions – and helps you save money week after week. Buy it now.
How to Make Fresh Pasta
Ingredients
- 2 cups all-purpose or extra strong type 00 flour, if using freshly ground flour, have an extra 1/2 cup on hand depending on the hydration rate of your particular flour
- 3 eggs
- 1 teaspoon olive oil
- ½ teaspoon sea salt
Instructions
- To Make Pasta with a Stand MixerPlace all ingredients in the bowl of the mixer fitted with the dough hook. Mix until a cohesive dough is formed and the dough pulls away from the sides of the bowl. The dough should be just slightly sticky. Add more flour by the teaspoonful if needed, but keep the dough as soft as possible. If the dough is too dry, add a little water; if too wet or sticky, add a little flour.
- Knead for another 5 minutes. Cover the bowl with a damp kitchen towel and let it stand for 20 minutes.
- To Make Pasta by HandMound the flour on a clean work surface. Make a well in the middle of the flour with steep sides.
- Break the eggs into the well. Add the salt and olive oil and gently mix together with a fork. Gradually start incorporating the flour by pulling in the flour from the sides of the well, but try to maintain the integrity of the wall as long as possible. Usually this finally gives way into a shaggy mess when about half of the flour has been mixed in.
- With your hands or a bench scraper continue working the dough until it comes together. If the dough is too dry, add a little water; if too wet or sticky, add a little flour.
- Begin kneading the dough and keep kneading until it becomes smooth and elastic, about 8 to 10 minutes. Cover with a damp kitchen towel and let it rest for 20 minutes.
- Shape Your PastaIf you have a pasta machine, this process is much easier, unless you have the dexterity of an old Italian mama who is able to roll out paper thin pasta sheets with nothing but a rolling pin. That is not me, I'm afraid, so I much prefer the rolling machine.
- If you'd like to roll by hand, however, divide your dough into two pieces, keeping one covered to prevent drying out. On a large floured work area, flatten the dough into a disk. Working from the center at all times, use a rolling pin to flatten the disk out from the center to the outer edge. With each roll, rotate the dough one-quarter turn and flip the dough over once or twice to ensure the dough is not sticking. Roll out the dough to about 1/16" thick or desired thickness, depending on the type of pasta you are making.
- To roll out using a machine, divide your dough into 6-8 balls. Keep the balls you are not using at the moment covered to avoid drying out and do the entire process with each ball before moving on to the next one.
- Flatten the ball slightly with your hands and roll it through the machine on the widest setting (on my machine, the widest is #1). After each pass, tri-fold it and roll it again on the next smallest setting - this will ensure the most evenly shaped sheet of pasta. Continue to reroll them on progressively smaller settings until you reached the preferred thickness. For stuffed pastas, stop at #6 or 7. For long pastas, such as spaghetti, tagliatelle, and linguine, stop at #6. For lasagna sheets, roll to #8 or 9.
- If you have a machine attachment to shape the pasta, attach it now and roll each sheet through, catching the cut pieces on the other side. If you don't have a cutting attachment, lay the rolled pasta sheets on a floured surface and use a sharp knife, bench scraper, or pizza cutter to cut the pasta into strips. There's a fantastic photo tutorial of different types of pasta and how to cut them at Recipe Tips.
- Set strips on floured tea towels or drape them over a long broom handle, being careful not to let the pieces touch if at all possible. For lasagna, there is no need to cut them. If you have a pasta extruder, such as for macaroni or conchi, you skip the rolling and go directly to the shaping.
- Cooking and Storing the PastaTo cook the pasta fresh, bring a pot of salted water to a boil. Add the fresh pasta and cook for approximately 2 minutes. Fresh pasta reaches the al dente stage very quickly, so be ready.
- To store the pasta, let the strips dry for several hours, turning them as necessary to dry thoroughly. You may also dry them in your food dehydrator for 2-4 hours at 135°F. When they are dry, place them in airtight packages.
- If you don't have a way to dry them, flour the strips well to keep them from sticking, place them in freezer-safe bags, and freeze them for up to two weeks.


Have you ever made a homemade pasta similar to Barilla plus with legume flours as well as wheat? I’d love a recipe for that. ; )
No, I’ve never cooked with some of the specialty flours like garbanzo flour or other legumes. That’s a great idea! Sorry I can’t be of more help.
Do you know how long the dried noodles will keep for? I’d like to make a large batch to keep on hand but I don’t want itvto spoil before I can use it.
If it’s completely dry (as in, it will snap – not bend – when you break it), it will keep for years in the cupboard, although typically I like to use it within 3-6 months.
I hope that helps!
Nonsense. Fresh pasta doesn’t need salt or olive oil. And is almost impossible to dry at home
You’re right. Homemade pasta doesn’t *need* salt and olive oil, but they’re lovely additions that make the dough more pliable and ever-so-slightly more tasty.
And drying isn’t “almost impossible” – it’s rather simple, if you’re willing to have pasta hanging off all sorts of random items like brooms and hangers and towel racks, unless of course, you have a pasta rack. 🙂
Thanks for the recipe. I absolutely love how the pasta tastes. It has a nice and chewy texture. I made them into two sizes. The fettuccine turned out great. The sphagetti shape required a lot of work to separate the strand individually. Do you know why did this happen?
Hmmm… that’s a great question. I’m not sure why the spaghetti would do that if the fettucine worked out fine. Was there less flour on the table / workspace, perhaps, when you were cutting the spaghetti?
Regardless, I’m glad the recipe has worked well for you! It’s definitely a favorite in our family. 🙂
Tell me you don’t have a food dehydrator, without saying you don’t have a food dehydrator…
Thank you for the recipe! My husband and I really enjoyed it. : ) I shared a link to it on my blog!
Sarah
Excellent! I’m so glad. 🙂
Thanks for letting me know!
Hi!! I am 11 and am curious on how long it takes to roll the pasta by hand. I don’t have a pasta roller and want to cook dinner for my family tonight. Good idea? bad idea? I am open to opinions. 🙂
The rolling is quite quick – just a few minutes. It’s the cutting and subsequent finding places to set the cut pasta that can take a bit. It’s been a while since I did it by hand, but if I remember correctly I used to set aside maybe 30-45 minutes for the rolling and cutting?
I hope that helps!
Is it typical to not use all the flour?
Yes! It’s definitely by feel rather than by measure. 🙂
This was a hit!
Success!
So amazing!!!! 😋😍 i hand rolled it because we don’t have a pasta press but it was so worth it.
I added an extra egg yolk for fun. Have made these a couple times and they turn out so good!
Did not like it at all!! It was a huge ball of paste after boiling.
First time making pasta but it turned out great!
Turned out great!
Surprisingly easy! Used a stand mixer to make the dough then rolled and cut noodles by hand.
Turned out great!
Came out a little thick but tasty.
Not so pretty but they tasted good!
Recipe worked well for dough ! Just double check thickness when rolled out. Mine ended up a bit thick, so next time I’ll roll them out more! Good taste though !
Tried and loved it! I didn’t add any water, and had to add more flour along the way, but it turned out amazing!
I love this recipe! Easy and turns out great every time!
loved this recipe!
Came out perfect!
I doubled this recipe and it comfortably served six. Delicious!
I didn’t have a pasta machine but i had to cut it myself, came out like fettuccine but it was still great!
Quick and easy!
Added half a cup of semolina flour to the two cups of flower
This pasta was easy to make and delicious. I recommend making it.
Can’t wait to eat!!
First time was amazing! Pasta expands in water so I’m gonna go even thinner next time.
Sooo delish!
Oh so good and easy to make. I made enough for lasagna and extra fettuccine noodles for future meals. It is now my go to homemade pasta recipe. I did have to add 1.5 tsp of water to the dough.
So easy! Kids loved it, rolled sheets made ravioli and fettuccine.
Mmmm delish with homemade marinara sauce!
Added food coloring to it and made mermaid pasta
Delicious!!
Yum! #FreshPasta #PastaDough #HomemadeNoodles
I made a spinach walnut pesto with the pasta turned out great!
#delicious
I added 1/3 cup of water and it turned out great!
Delicious! And easy!
Great recipe!
Made it twice now. Always have to add a bit of water to help it come together.
1.5 cups 00 to .5 cups durum
Grandchildren loved making it.
Can you refridgerate the dough if you have leftovers?
Yes, absolutely! You can refrigerate the dough for up to three days, but I recommend only one day for the best taste and texture.
Also, if you’re refrigerating dough that’s already been cut, you will likely want to sprinkle them with flour before refrigerating them so they don’t stick together while they sit, or lay them out on a baking tray.
I made this and it was AMAZING! Thanks for posting! ❤
This turned out great, and my kids loved it! Learned along the way to add lots of flour as we were cutting it. I wasn’t prepared with a hanger to put the pasta on, but we will have one handy next time.
Loved this! We did end up adding 1/3 cup of water to the dough (like another commenter mentioned) also don’t make the mistake we did thinking that because we were going to cook the pasta instantly that we could get away with not hanging the strips- unfortunately a lot of pieces stuck together and didn’t cook right but a lot was still saved!! Just a rookie error, still delish!
Made this and it was really good! I will be buying a pasta machine before I make it again though.
Great! Didn’t have a mixer or pasta press so did it all by hand.
So easy.
Best homemade pasta
The best pasta recipe.
Will make again.
So good.
Amazing recipe.
Wouldn’t this keep for a long time if you freeze dry it?
Well, yes, but if you freeze dry pasta, it would likely turn into a paste rather than rehydrate into noodles when you add water, so freeze drying wouldn’t necessarily be the best way to preserve pasta. You can certainly try it though. I’d be interested to know how it turns out!
This was so easy to make and everyone enjoyed it 😊