
Easy 5-Minute Homemade Pudding Cups
This post may contain affiliate links, including those from Amazon.com, which means we earn a small commission off your purchases. And here's the thing: We only mention services and products that we think are truly worth your attention, whether they're free, paid, or otherwise. This site relies on YOUR trust, so if we don't stand behind a product 110%, it's not mentioned. Period.
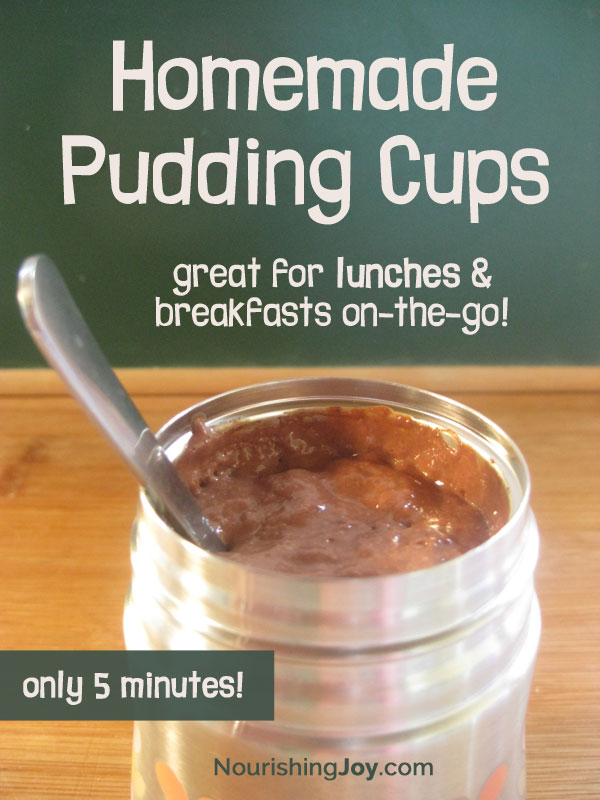
Whether you're packing a school lunch or just wanting a yummy portable snack, pudding cups are a great treat. I have a weakness for pudding, personally. 🙂
But the store-bought versions – like I've said about so many other store-bought items – are chock full of preservatives to keep them shelf-stable, chemical stabilizers to make sure they act and taste the same no matter what end of the world they end up in, artificial flavors, inflammatory thickeners, and hydrogenated oils. Blech.
On the other hand, homemade pudding cups are chock-full of ingredients that are beneficial and desirable in a healthy diet.
Perfect for Quick Breakfasts, Lunches & Snacks
I sometimes make these for a quick, easy-to-grab breakfast on busy mornings. Paired with fruit, homemade pudding cups are perfect for families trying to fit breakfast in between finding lost shoes and making sure this week's library books are actually in everyone's backpacks.
And while my absolute favorite homemade puddings are with a classic custard base, both for the luxurious, creamy texture and for the benefits of eating more egg yolks, this homemade pudding is based off of panna cotta, the delightfully easy Italian custard that uses gelatin instead of eggs to set the pudding.
This not only has the benefit of making the pudding safer to cart around in a lunch box for hours on end, but it's quicker to make and provides an extra punch of protein. (And gelatin is fascinating not just because it makes things fun and jiggly, but because of its unique nutritional make-up, so don't miss our post where I gush on the latest research about the benefits of gelatin.)
5-Minute Prep
These pudding cups come together in about five minutes, which is easy to do right before bed, and then sit overnight in the refrigerator to be ready to grab in the morning for whatever awaits you. You can let them sit for just 2-3 hours if you need, but doing it overnight just makes it easy.
And if you trust your child with a blender, it's a great recipe for kids to make with just a bit of supervision. Let's get our kids in the kitchen!
If you'd prefer a classic, egg-based version, that's not difficult either and it takes about 30 minutes – there's a recipe in my book, The DIY Pantry.
You can also change these from chocolate to any other flavor you'd like. Just remove the chocolate and reduce the sugar a bit (it's higher than usual to offset the bitterness of the chocolate). You can see my basic panna cotta recipe to use as a foundation.
A note about containers
The sky is the limit on your creativity here. Use anything that holds about a single-serving amount and has a firm, spill-proof lid (if you plan on packing them in lunches or for other activities). This can range from clean, leftover single-serve yogurt containers, small insulated travel containers, small jelly canning jars, or whatever else you have on hand.
Enjoy!

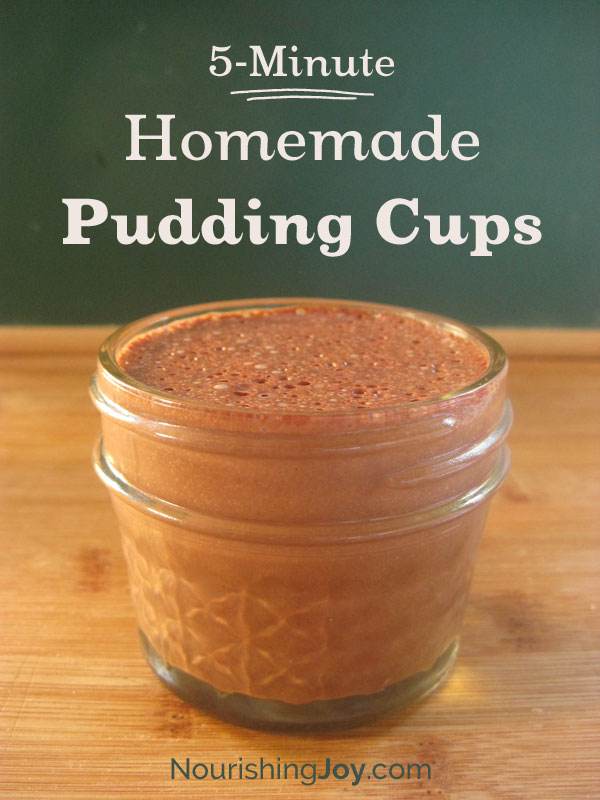
Homemade Chocolate Pudding Cups
Ingredients
- 1 ½ cups whole milk
- 1 ½ cups heavy cream
- ¾ cup evaporated cane sugar, honey, maple syrup, sucanat, or brown sugar
- ½ cup cocoa powder, any variety will do, but of course, as with all things chocolate, grab fair trade if you can
- 1 ½ tablespoons gelatin
Instructions
- Place ½ cup of the milk in a small, heavy-bottomed saucepan and sprinkle the gelatin over. Let sit while you gather your containers and the rest of the ingredients.
- When everything is gathered, heat the milk very gently over low heat just until the gelatin is dissolved. (Dip your thumb and forefinger in the warm-ish milk and rub them together. You won't feel any granules when they are fully dissolved.)
- Meanwhile, pour the remaining milk, the cream, sugar, and cocoa powder in a blender. Blend until very smooth, then with the motor running, pour in the gelatin-milk mixture.
- Pour immediately into your containers and place in the refrigerator. Let sit for at least two hours and enjoy within five days.
Notes

Awesome, I have it all and school starts tomorrow !
Do you think this would work with almond milk? We don’t keep cows milk on hand much.
Yes, it would work just fine with almond milk! And tasty too – I love almond and chocolate together. 🙂
I just made this today and it has great flavor but it set up solid, lol. I’m definitely going to make it again, but I’ll cut the gelatin in half. Thanks for the recipe!
Have you tried to freeze these for make-ahead snacks?
I have frozen these to make a version of frozen fudgsicles, but I haven’t thawed them, so I’m assuming it would work fine, but I can’t guarantee they’d still be silky-smooth. But what a great idea! A month (or two) of snacks – ready to go! 🙂
What about other flavors, Vanilla, Peanut Butter (or Chocolate Peanut Butter)…etc? Suggestions.
Definitely! You can make this with any flavor you so desire. 🙂 Just keep the liquid:gelatin ratio about the same and you should be able to make substitutions fairly easily. 😉
Just found this recipe while looking for healthy chocolate pudding recipes for my daughters’ lunchboxes. It spurred me to make my first purchase of gelatin ….well, since I was a kid stirring up the boxed stuff years ago. Very excited to try it!
Silly question, but how do you pack for kids lunch?can they be 4 hours or so out of the refrigerator or will they spoil?
You can just pack them like you pack other refrigerated items, so just keep them in the refrigerator until the kids leave for school and as they are packed, just slip in an ice pack or place them next to a cold drink. They’ll be good to go! 🙂
ENJOY!
This was fantastic! I made it for my kids but might gobble it all up myself.
I’ve never tried making my own pudding from scratch, but my goodness, these look so, so good! <3!
I’m a blind woman who absolutely loooooooves chocolate pudding! Even just pudding in general! I’ve made snacks with gelatin since I was younger. Of course I started with the store bought versions. Then in October 2015, when a blood test revealed my cholesterol was borderline high, I went home and made a big change, and I started trading store bought items for ingredients made right at home. Making stuff at home makes me feel so brand-new! Which leads me to my question. Can I make this pudding in a bowl like I would the Instant Jello version? I’ve just recently started buying plain gelatin (They have it in bulk at Market Of Choice), and the first thing I made with it was a healthy version of gummy snacks, with real fruit made into puree, and 100% fruit juice, with 6 tablespoons of gelatin. I heat the mix in a pan, bringing it to an almost simmer (it takes maybe 3 minutes). Then I pour the mix into molds (I have a cute one with hearts, and I hope to get more shapes soon), and I put it in the fridge for an hour or two. Then I pop the newly-made shapes out of the molds, and let me say, they taste amazing! I have to do this with Mom’s help, since I’m a bit frightened of the stove, and when we made the fruit snacks yesterday, the stove sparked and literally shorted out the power in my bedroom! This is because I’ve lived in a studio apartment (which I rent) for almost 7 years, and the stove and oven they provide, along with all the other appliances they provide, isn’t exactly the best quality. Within five years, I’ve had to have the washing machine gasket replaced twice! I’ve even had to replace the gaskets on the fridge and the freezer, as everything was starting to run warm. I’ve even had to have the stove burners replaced at least three times within the span of living here, and unfortunately we’ve found that it’s actually the wiring in the stove that has something wrong, as the burners snap and pop when we run them, and they run a bit hot, even when the heat is on low! I wish they could let me purchase a Kitchenaid stove and oven, as from what I’ve read, the controls are supposed to be accessible to those who are blind. The stove has dials, but the oven I have is all digital, so I can’t see what temperature it’s on, and it’s a touchscreen control panel. Kitchenaid, from what I’ve read, makes it so their ovens have a control panel that behaves somewhat like a microwave oven, where one can actually enter the time and temperature via a keypad, and each keypress beeps as you enter. I bet their stoves have dials like the stove I have, but I bet they’re a bit more accessible. Or maybe the stove and oven from Kitchenaid has the stove components on the same keypad control panel as the oven.
Wow! Sounds exciting! 🙂
Anyway, I’m not sure whether you’re asking whether you can MIX it in a bowl or have it set in a bowl (rather than individual molds). If you’re asking about mixing it in a bowl, then no, simply because the gelatin needs to melt on the stove. If you’re asking about pouring into one big bowl to set, then yes, absolutely. That will work just fine.
Did I understand your question? Or did I miss it?
I’m actually asking whether I can mix it in a bowl, then let it set in that same bowl in the fridge.
I wonder, could I whip this up in a mixer rather than a blender? For example, pour the remaining milk, the cream, sugar, and cocoa powder in the bowl of a stand mixer. Using the whip attachment, blend until very smooth, then with the motor running, pour in the gelatin-milk mix through the slot of a pour guard. If I mix this in a stand mixer, what speed would I put it on? I know I would start on low.
Hey Kresha!
Mom and I made some of that chocolate pudding the other day, and I wanna say, it tastes like Heaven in the stars! Thank yououououououou! We used my Kitchenaid stand mixer instead of a blender, as mom says a mixer is a lot better for making puddings, especially since we used the whip attachment. It turned out to have that creamy, whipped texture that I looooooooove! This recipe is so easy, it makes me wanna say that I’ll never buy store-bought pudding mixes again! We even made homemade chocolate twinkies/ However, putting the pudding in the center was a bit difficult, as the cakes were still warm, so not only did they explode like cake bombs, but the pudding melted and absorbed in the cakes! Mom and I will try again, and hopefully we’ll make it so the pudding won’t melt. Also, since I don’t have a canoe pan, I made rectangular twinkies instead, as I had to settle for a rectangular loaf pan.
Awesome! I was looking for a pudding recipe I could make with grassfed beef gelatin, keeping the benefits of raw milk, (hopefully sneaking in a bit of yogurt for my mom’s digestive health, now all i need it to successfully tweak it to using stevia 🙂 for her diabetic diet.:) have you tried the recipe using any low glycemic sweetners?
Yay! And no, I haven’t tried this with any sweeteners other than whole sugars, but stevia would be my go-to. I’m sure it will be delicious! 🙂